This is the second part of the article on building my first own cab. Read the first part here….
Round hole
There are many ways to get job done, but since it was Father’s day, I chose to get myself a router and to try it out. And it turned to be the ideal tool for the job. After reading several reviews and considering the budget I have ordered Bosch POF 1400 ACE. Not the cheapest one, but can do many things. See my notes on the right bits to get the rest done properly.
First I have cut a hole in a piece of scrap wood, which turned to be very nice, so then it was time for the “real thing”. The result was pretty much the best I would imagine. After some sanding it was looking really nice, so I was pretty much proud of the result.
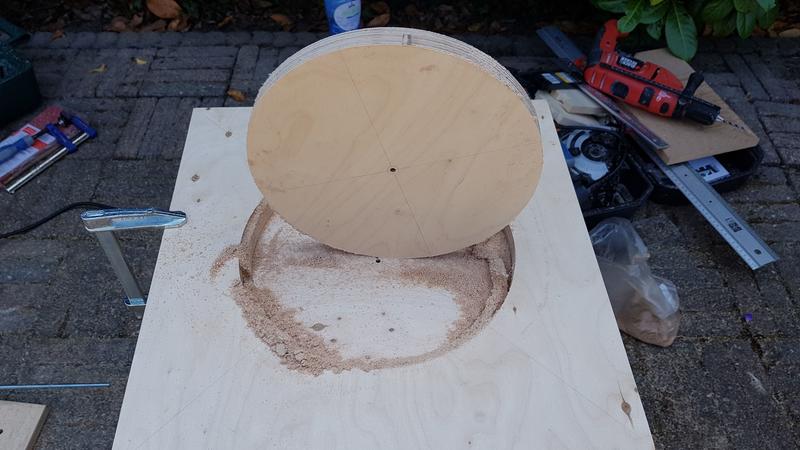
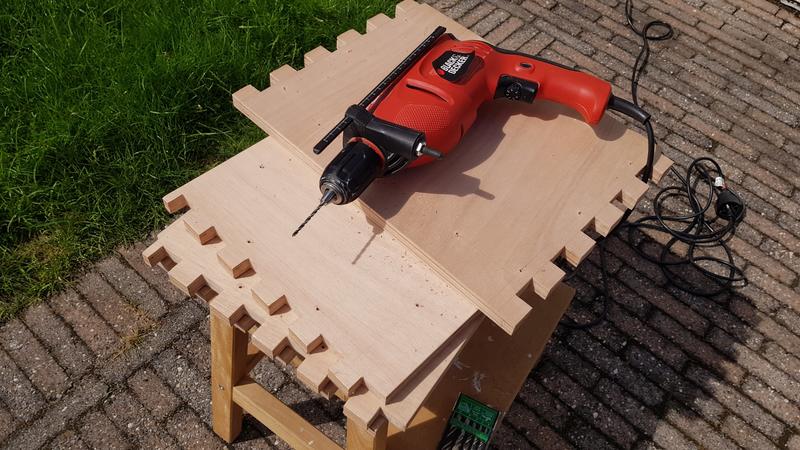
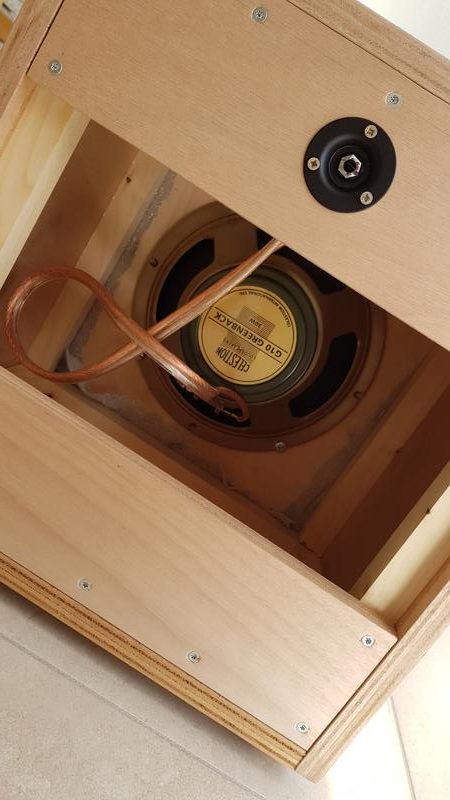
I have measured the resulting hole with the speaker and it turned to be completely correct (hey, if Celestion says it has to be 229 mm they better to be right! :)). I have marked the placement for the holes for fixing the speaker, drilled 8 mm holes and installed T-nuts to ensure I can mount using proper 6 mm bolts. Works nicely.
I have also made two variants of the “back plane”: full size (for closed cabinet may I want one) and a smaller piece for “open back” (which I prefer normally). Both required 30 mm cut out and some additional filing to get some space for the attachments of the wires to the (improperly chosen) Neutrick jack and fit the connector dish.
So then the toughest part came…
The finger joints
Well, as I mentioned above, my attempt to use the router failed as I didn’t have the right bit to cut according to the jig. I have tried several times and I was completely not satisfied with the result. Plywood wasn’t cut as nice as I wanted and there was still a lot to cut off after using the special add-on for following the patterns. I was just fed up. So I am sure there were other ways to get it done, but I was so frustrated at that point, that I just took my circular saw and made the “vertical cuts” (always aiming at the side to be cut off) and then cut out the “holes” using the fretsaw.
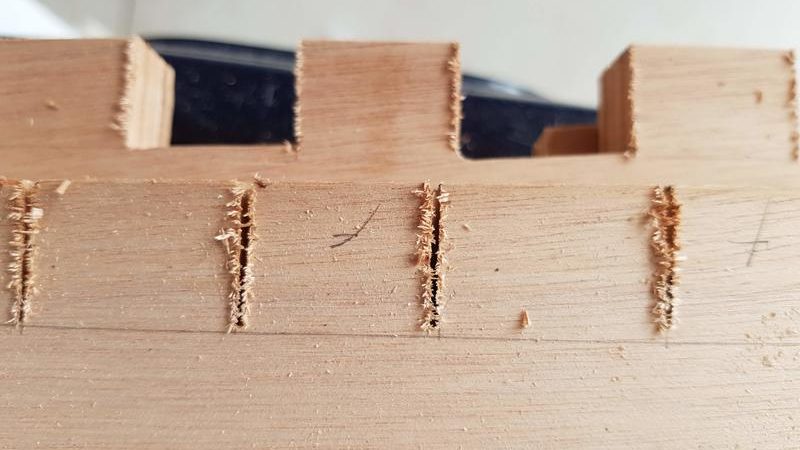
And then there was a lot of filing, measuring, swearing and filing again. As you can imagine, it was far (and I mean very far) from perfect, some sides worse than others, but at the end I had my box!

The box
Then the fun started. I have cut the pieces from planks for the inners of the box. If course I have made a mistake, but the first-timers and idiots are lucky (and hey, I was two-in-one!), so I just could cut further and make it the right size (my dear neighbours, I am truly sorry for the noice during your dinner, but I hope you could feel my joy doing this!). In meanwhile some rain came, so I took time to measure and mark where I wanted to pre-drill small holes for the screws (didn’t want to get cracks, perhaps too cautious?). Between the waves of rain I have drilled many (and I mean many!) holes and it was finally the time to get things together.
This was the time when I found I had wrong screws (hey, 18 + 27 is 45, do NOT get the 45 mm screws or they will stick out, right?), but a quick drop to a nearby DIY shop saved my day. With a box of 100 screws I was sure my box will not fall apart even if it wanted to :)).
In the back of my head I was kinda scared it wouldn’t work, but luckily some filing saved the last mm’s of the tight fit. I put some wood glue (TIP: look for D3 or D4 marking) and started assembling the whole thing. I have started with adding planks to the bottom, glueing and screwing the planks, and building the “walls” one by one.
TIP: do not forget to check the straight angles regularly!
So when the box (except for the front and the back) was assemled I have added some improvised clamps (not ready to throw too much on the proper 400 mm+ clamps, which would total for more than a new speaker!). The final construction reminded me of the Willy Wonka’s braces in the “Charlie and the Chocolate Factory” movie.

Final touch
In the mornig the “bracing” was removed, I spent good 10 minutes thinking about the front grill :). I have bought a round metal grill for 10 inch speaker (among other small things like feet from Tone Factory), but it didn’t work well with the prep for the speaker, so I had to drop that idea. My older daughter “donated” piece of cloth meant (I guess) for her dress, which played nicely with other “metal” parts (although I was at a point of “sacrifising” one of my T-shirts :)).
Anyway, installation of a front and back went rather smoothly (ok, I may have put too many screws, but… better more than less! ;)).
So finally this is what I ended up with
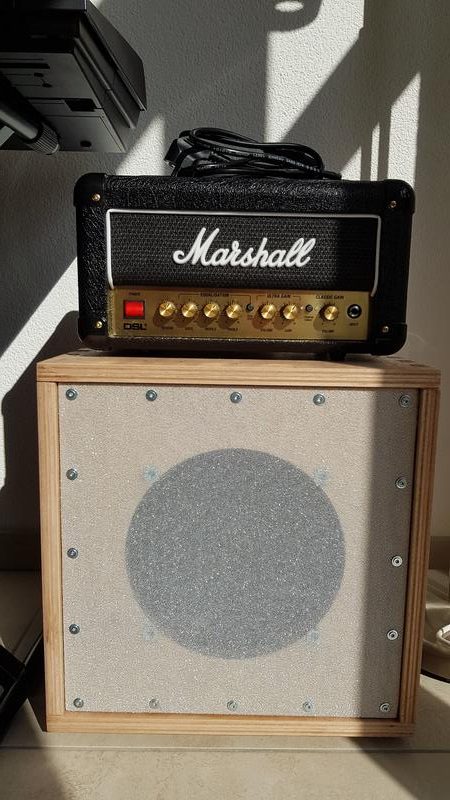
The only thing I heard from my wife when I turned it on that “it is too loud” (1W, c’mon!) ;), but all in all I was OK with the result.
What failed
Foremost, not all “finger” joints despite prep and tries were fine. I guess that’s where the part of “how to fix the imprefections” learning comes in. Some shimming and glue took away the worst / visible ones.
The handle I have bought was waaay to big to fit under the tiny DSL head. I guess it was meant as a “head” handle. I have even sacrificed my old belt, but that was too thick as well. So there will be no handle for a while (well, it is not meant to be portable, so who cares?).
The screws for the input jack “dish” were not correct, you need the T-sized head (flat at teh bottom), mine are sticking out like hell. I will have to replace (no big deal, but…).
The front is more of a joke, so I may replace it over the time. May be not :).
Instead of conclusion
The whole exercise (except getting all parts form stores, etc) took me two and a half days. Two crazy days cutting and half-day final assembly. Half-way I had a feeling it was almost hopeless, but I was determined to “get the sound out of damn thing”, so there was no way out. My back and all little muscles ached (whole assembly on a wooden IKEA stool which miraculously survived many DIY hacks) and my hands were burned under the sun. But hey, that’s me. Settle on the goal and get there or drop dead… Left or right it had to get a form of a cab. Otherwise this story wouldn’t be complete :).
Hey, and after it even plays nicely! The Greenback is great in combination with Marshall (as expected), the little Marshall sits comfortably on the top of a not too large (and “convertible”) cab. I will still have to try humbuckers with it, but for bluesy stuff it is so pleasing my “old school” soul.
Along the way I have built a “table” for my youngest daughter toys, which actually looked not too bad (remember the round cut-off for the speaker? :)). And, finally, my wife was not amused to hear word “prototype” applied to the cab. “How many of those things are you going to build???” Haha, I’ve tried to give a diplomatic answer on that…

Keep playing, have fun!