Here is a basic setup for audio (and video) recording. Since I have no prior experience I tried to have simple but effective setup. I hope this helps.
Why record
Many teachers advise to record yourself to see how you actually sound and what you should work on. Besides that it is a lot of fun! And for myself personally I found that I am very shy in front of camera (haha, see for yourself!). Every time I start the camera I miss the notes, play wrong chords, you name it. So… I need to record more!
Audio (guitar) recording
OK, so here is the basic setup for an electric guitar. You need the following things:
- A computer (Mac or PC, but an iPad would do as well) with recording software. I use the Apple’s built-in GarageBand. There are many other choices available. Look for DAW software to see commercial options. You do NOT need an expensive DAW to start with!
- An audio interface to connect your guitar (or mic) to a computer. I use somehwat older one, Yamaha Steinberg UR22 MKII, but there are also popular choices from Focusrite, Presonus and Universal Audio. If you’re into mobile device recording the iRig looks like the perfect solution, but I would go for a device with at least 2 inputs, see the schematics below.
- If you are recording sound over the air connect mic to the audio interface instead of the guitar. I used the cheap and still effective t.bone MB75 from Thomann, which is a clone of the reference Shure SM57 (if you have money and perform on the proper level).
- Cables to connect everything. You would need at least a good instrument cable to connect your guitar. Most of the time I use the Cordial CSI Silent series. Any other good quality cables would do as well!
- Last but not least you need either monitors (speakers, e.g. KRK Rokit 5 or similar) or good headphones like Beyerdynamic DT 770 Pro 250 ohm to listen to your sound in its original form.
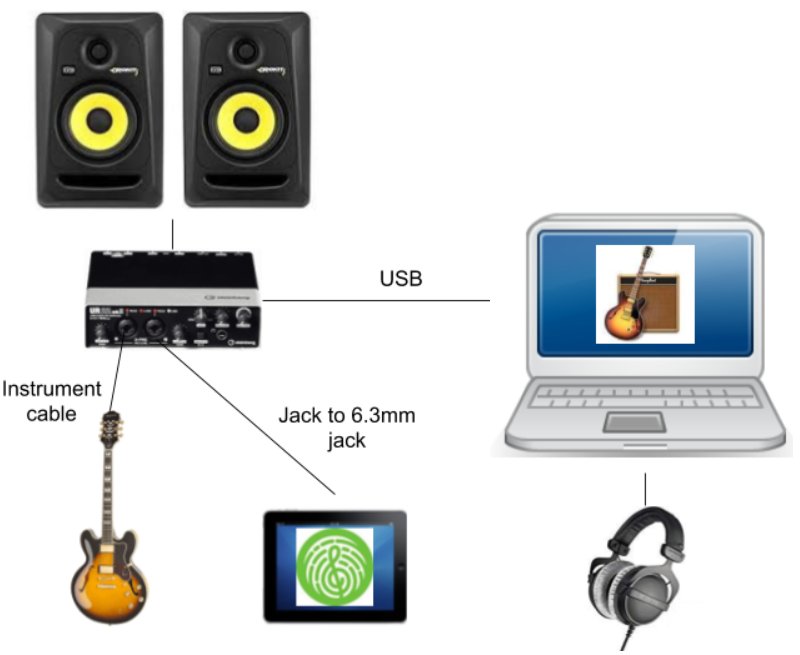
Here is the schematic overview of the connections:
The guitar is connected to the audio interface channel 1 using an instrument cable. A device (iPad, etc) running Yousician is connected to the audio interface
To start recording I normally do the following:
- Find the proper sound setup in GarageBand (you can always change it after recording!), don’t forget to enable the recording button on tracks! HINT: look for track headers.
- (Optional) start video.
- Start recording in GarageBand.
- Start Yousician/backing track.
- Play…
- Stop Yousician/backing track.
- Stop GarageBand recording.
- (Optional) stop video.
After that I review the material, edit/adjust (you can adjust voicing of your guitar any time, you won’t be stuck on the setup you chose initially!), export as e.g. mp3 and later add to the video replacing the original soundtrack.
Video recording
OK, you obviously need a video camera, but that’s not as easy as it sounds. You want to put it on a tripod and if you record on your own (like I do) you want to see what is happening. With some cameras it is just a question of flipping the camera screen around. In my case I installed an external monitor to see what is being filmed. You don’t want to end up with video not capturing the rights things when you did your best to play.
A couple of quick tips:
- Use a good tripod, something like Manfrotto 055 is a good starting point.
- If you need an external screen, Feelworld F5 may be a good option. Don’t forget you’d need a DVI cable to connect the screen to your camera!
- Finally you need some software to marry your recorded audio track with your video. I tried the free AviDemux, but after hours of struggle matching audio and rendering retries (not helped by updates loosing functionality) I switched to Apple’s iMovie and I am happy ever since.
Disclaimer: if you follow the links to Amazon above and buy stuff I get a small fee which will help running this website.
Hapy recording!


